Recently Completed Shiplap Fireplace!
- B2 Home Solutions

- Jul 11, 2019
- 2 min read
Updated: Aug 5, 2019
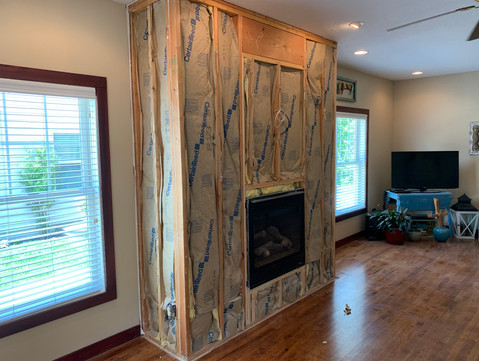
Recently completed a project for a client that involved demolition of their existing fireplace surround and creating a new and updated look and feel for their living room! The design the clients were looking for was a bright shiplap look with a dark stained floating mantle and incorporating a space to mount their flatscreen tv. The existing design was much too dark and dated and they wanted a look that would make the space much brighter and more inviting!


The demolition process started with stripping all the drywall, tile, decorative moldings, and mantle off down to the stud frame. Once the materials were cleared and disposed of we worked on moving some electrical and tv coaxial to allow for mounting a flatscreen. Also added in some extra studs to add to the structure to allow for the large lag screws that the tv mount would fasten to.


Preparation for installation of the shiplap was the next step. This involved measuring and some math to mark out how to place the shiplap pieces to create a consistent look but also ensure it would be installed level and stay plumb throughout the installation. After this we started the shiplap installation.
As you can see, the design did not include actual shiplap, but instead we used 5.5" square base mold and used spacers to create a consistent gap between each piece that was installed. This method may take a little more time by setting all of the spacers, but it will save you some money from using actual tongue and groove shiplap. Once the shiplap was installed we started on trimming out the base, top and corners of the fireplace surround to make the shiplap appear seemless. Another option instead of using trim on the corners would be to miter each shiplap piece, but be prepared to spend quite a bit more time on the project!!!


After assembly was complete and a few hours of sanding, the surround was ready from primer and paint. Here is a short video of us starting the paint process. The sprayer we tend to use the most, and I believe is one of the best sprayers on the market, is the Titan Impact 440. We normally use a 310 Graco tip and it creates a flawless fine finish, perfect for these types of projects!
As you can see in the video below, we strive to keep ourselves safe from paint and fumes - fully suited up with a Tyvek paint suit and full coverage respirator!
Next step was building the floating mantle. To mount the mantle we created a wall cleat that the mitered mantle box would fit over top of. The mantle box itself was made from knotty alder plywood and was mitered on each edge and glued with titebond II. For a stain we used a dark walnut from Sherwood stains.
The finish project turned out amazing and we had some very pleased clients! It was a fun project to complete and certainly did make this the focal point of the space!

Thanks for reading, and please reach out to us if you have any projects in mind!
Here are a few links to the products we used for this project:


Comments